Looking to learn about barre chords? You’re in the right place!
In this free guitar lesson you will learn:
- Learn 5 essential barre chords.
- 3 tips for clean & easy barre chords.
- 2 advanced barre chord secrets. (Complete with bonus video & tips.)
Let’s get started.
Over 250,000 guitar-learners get our world-class guitar tips & tutorials sent straight to their inbox: Click here to join them
So what are barre chords?
A barre chord is a chord where one of our fingers is pressing down more than one string.
If you’ve never played barre chords before, then that probably sounds quite difficult, and it is at first. BUT, like a lot of things, with practice and patience you’ll get the hang of it.
Barre chords in many ways mark our transition from beginner guitarists to intermediate guitarists, so please don’t be put off if you struggle with them at first.
Barre chords aren’t easy.
Why are barre chords important?
You might be asking yourself, “If barre chords are so difficult, why not just stick with ordinary open chords?”

There are some chords that quite simply can’t be played in the open position. Sooner or later, you are going to encounter a song that unavoidably has a barre chord in it.
Barre chords also allow us more options for chords we already know. If we only know one way of playing a chord it can limit our playing considerably.
Our first barre chords
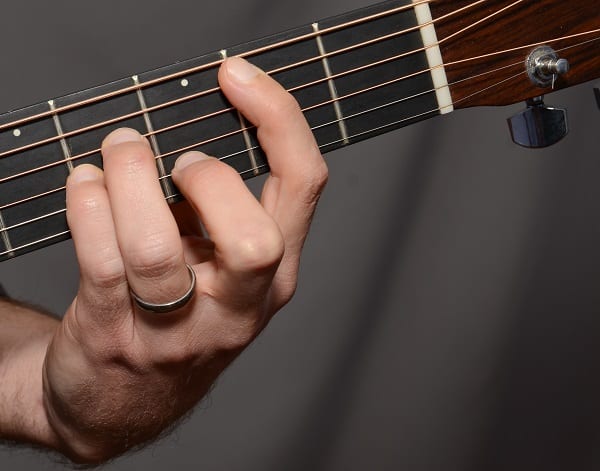
Because barre chords can be tricky, we’re going to start off with the absolute basics of barring before we do anything else.
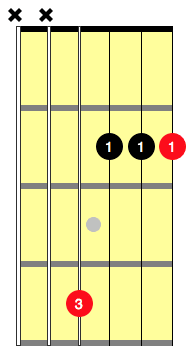
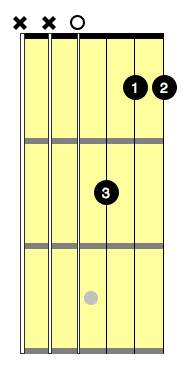
You know your normal A chord?
(If you don't understand the above image please read our article "How To Read Guitar Chordboxes In 60 Seconds". It will make everything clear!)
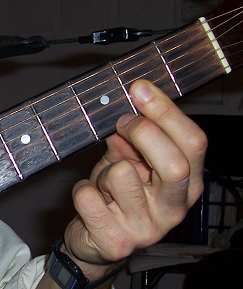
Normally you’d play that with three fingers… but we’re going to try playing it with just ONE finger.
All we need to do is lie our index finger across all three of the strings and press down.
Like this:

NB: You’ll probably find unavoidably that you end up pressing the high E string down as well. That’s fine. We simply don’t strum that string when we’re barring the A. If you can’t help but strum it, that’s not a problem. It just means you’ve got yourself an A6 chord instead of just an A chord. Jazzy!
Give it a try.
How does it feel? A bit uncomfortable perhaps? Do you find you’re having to press quite hard?
That’s quite normal. Don’t worry. It takes time for our fingers to get used to barring.
How does it sound? Are some of the notes not quite sounding? Are you getting a lot of dead string noise instead of nice clear notes?
Again, perfectly normal.
We have to be patient and allow our fingers time to get used to barring.
Try strumming the chord and arpeggiating it (ie. playing one note at a time).
You’ll probably find the strum is a bit more forgiving than the arpeggio, but the arpeggio will show us exactly which strings aren’t quite being pressed down enough.
It’s important that you don’t hurt yourself when playing barre chords. Allow your finger plenty of rest in between attempts at the chord.
✅ Stop struggling. Start making music. ✅ Learn beginner-friendly versions of every chord. This is our most popular guide and it will improve your chord ability quickly! 😎 Get a custom guitar-learning plan here: Click here for GuitarMetrics™ Learn from the world's best guitar educators: Click here for our guitar coursesLearn 12 EASY beginner chords with our popular guide
Get your own personalised guitar-learning plan 🎸
World-Class Guitar Courses 🌎
The D Major 7 Chord
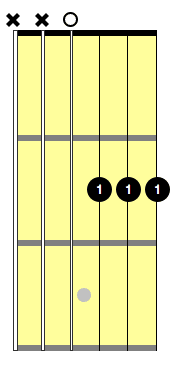
Dmaj7 is basically the same shape as the A, except we’ve moved everything over by one string, so we’re barring the 1st, 2nd and 3rd strings of the guitar.
Give it a try. Try strumming it and arpeggiating it.
You’ll probably find a lot of similarities with playing this chord and the previous chord.
A good exercise can be to practice switching between these two chords.
Try them in a sequence:
| A | Dmaj7 | A | Dmaj7 |
Before you go any further with barre chords, it’s vital to have these two down.
Take your time and don’t try to run before you can walk.
Spend as much time as you need practicing these until you’re happy with them.
Join over 250,000 guitar learners and subscribe to our guitar-tips-by-email service. (It's free.) We'll send you a series of lessons that will move you to the next level of your guitar journey. Learn how everything fits together quickly, easily and effectively. We share ninja tips (for instant fun!) but also timeless fundamentals that will deepen your understanding. To become a better guitarist click here to see our guitar courses Want us to make a guitar-learning plan that is customised to you? Click here for GuitarMetrics™Want free guitar tips and video lessons delivered to your inbox?

Our Guitar Courses
Get your personalised guitar-learning plan 🎸
More Barre Chords…
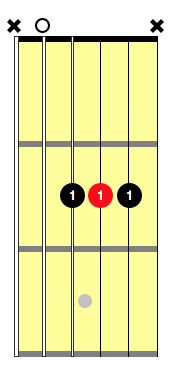
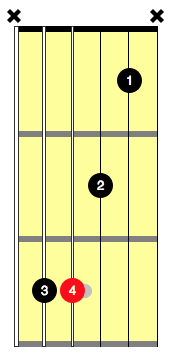
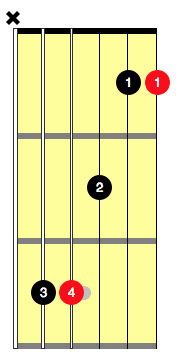
Once you have the A and the Dmaj7 down, a good barre chord to try next is F#m.
F#m looks like this:
The best way to approach the F#m is to first play the Dmaj7 and then reach over with either the 3rd or 4th finger and press down the D string (the 4th string) at the 4th fret.
Give it a try. How does it compare to playing the other chords? Do you find that when you stretch over for that extra note that your first finger tries to follow it? When you try and place your first finger back down does it pull your other finger with it?
This is quite a common problem.
Our fingers instinctively try to bunch together. It takes practice to persuade them to work separately from one another.
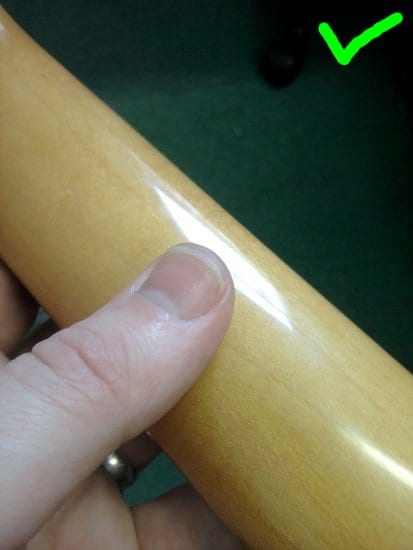
One thing you can do to help is to re-think the positioning of your thumb round the back of the neck.
Have a look at how your thumb is positioned when you play a chord.
Does it look like this?

Wrapped right around the back of the neck with the tip of the thumb peaking out over the top?
The problem with this sort of grip is, while it feels stronger in terms of pressing strings down, it does mean we lose a lot of our reach.
To get some of that reach back we want to move our thumb down a bit, closer to the centre of the back of the neck (the ‘spine’ if you will).
We also want to stand our thumb up a bit more so it’s just the print or the tip of the thumb touching the neck. Ideally we don’t want the palm or the heel of the hand touching the neck at all.
Your hand should now look a bit like this:
As you’ve moved your thumb to this position you can probably feel your fingers span out a lot more, allowing us more reach.
The downside is, you might feel you no longer have as much gripping power to press those strings down.
Eventually, you want to get to a stage where you can apply enough pressure to the strings without needing a death grip on the neck.
The reality is you may have to compromise a bit between grip and reach. Try adjusting the positioning of your thumb until you feel you have a good balance between the two.
This is where we have to again stress the importance of patience.
Barre chords aren’t easy.
They take time, so you must take your time. Don’t hurt your fingers by asking too much of them too soon.
Once you’re reasonably happy with your F#m chord then try it in a sequence with the A and the Dmaj7.
| A | Dmaj7 | F#m |F#m |
Now let’s look at a major barre chord.
You’re probably used to doing your F chord like this:
What we’re going to try and do is bring that high E string into the chord as well.
The way to do this is to flatten that first finger down so it covers both the B string and the high E string.
Give it a try. How does it feel? How does it sound?
Again, you may be having a lot of the issues we encountered with the earlier chords.
Remember, these issues are perfectly normal and they do take time to resolve, so be patient.
Make sure that you:
- Strum the chord.
- Arpeggiate the chord.
- Check the positioning of your thumb.
Once you’re reasonably happy with the F chord, there’s a nice easy change we can do to practice it.
If you simply lift off the third and fourth fingers, but keep the first and second fingers on, that gives you a Dm7 chord.
You might find this chord a bit easier than the F as it’s nothing like as much of a stretch.
Try changing between the two chords in a sequence, like this:
| Dm7 | F | Dm7 | F |
Moving barre chord shapes around the neck.
So, we now know a major and a minor barre chord shape.
The great thing about these barre chords is, we can move them all over the neck, allowing us to play all the major and minor chords.
All we need is a basic grasp of the musical alphabet.
Not familar with the musical alphabet? No problem. Check out this article: Guitar Notes Explained: A Guide For Beginners
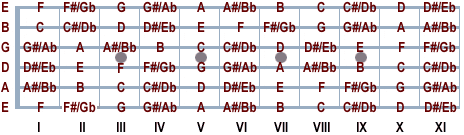
Both our major and minor barre chords have root notes on the D string, so it’s the notes on the D string we need to concern ourselves with. Here’s a diagram of the notes on the D string. (4th string.)

Here’s a chord sequence to practice:
| F | Gm |Am | Bb |
Let’s try and play it using our two barre chord shapes.
We already know our F, but what about that Gm?
Well, we know our F#m.
What’s the next note on the D string in the diagram after F#?
That’s right. It’s G. To turn our F#m into a Gm, all we need to do is slide it along by one fret to the third fret.
Try changing from the F to the Gm a few times. Now, what about that Am? Again, let’s use the diagram.
We’re on Gm. How far do we have to count up to get to Am?
That’s right. The musical alphabet goes: G G# A. So we need to move the minor barre chord shape up another two frets to the fifth fret.
So far so good!
Try practicing F to Gm to Am a few times before we look at the last chord.
Our last chord is Bb.
It’s important not to be put off by chords that have unusual names. It doesn’t necessarily mean they’re difficult to play.
We’re currently on Am. How far do we need to move up the musical alphabet to get to Bb?
That’s right. Just the one fret.
So we’re moving from the 5th fret to the 6th fret. BUT, remember, it’s a major chord we want, not a minor, so we need to switch back to our major shape.
This is important to remember as the difference in sound between a major and a minor chord is drastic.
Now let’s try the whole sequence:
| F | Gm | Am | Bb |
Go as slowly as you need to. Make sure you get the barre chords right above all else.
Make sure you have the right fret and the right shape.
Get our best guitar tips & videos
Where should we send it?
Get our best guitar tips & videos

