Looking for some fingerstyle guitar lessons? Let’s get started!
In this free guitar lesson you will learn:
- The basics of fingerstyle technique.
- 12 awesome exercises to get your fingers dancing around the strings.
- How to use your thumb, first finger and second finger for fingerstyle.
- How to apply fingerstyle technique to basic chords.
Over 250,000 guitar-learners get our world-class guitar tips & tutorials sent straight to their inbox: Click here to join them
Fingerstyle Guitar Lessons|#1 Understanding Technique
Fingerstyle technique is an awesome way to add texture and nuance to your guitar playing and is used by tons of different guitar players.
A classic beginner mistake is trying to use too many fingers to learn fingerstyle and fingerpicking.
In this lesson we are only going to be using our thumb, first finger and second finger.
That’s all.
We can cover a lot of ground with just these three fingers.
Here’s an awesome video of guitarist Bert Jansch who is a fingerstyle virtuoso:
Where Do I Place My Picking Hand?
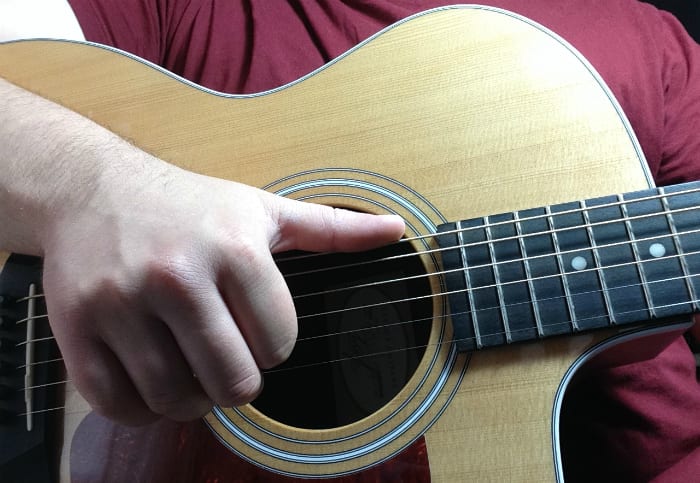
Your hand should be roughly above the sound hole, with your thumb pointing towards the headstock and your fingers just below it above the strings.
Where Do I Place My Fingers On The Guitar?
To start with it’s good to have a rule in place for where we’re going to place our fingers.
- The majority of the time your thumb will mainly be playing the thicker E, A and D strings.
- Your first finger and second finger will cover the thinner G, B and high E strings.
What About The Rest Of My Fingers?
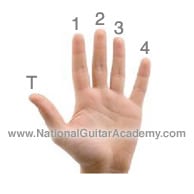
The fingers you currently have left are your third and fourth fingers.
There are a few things you can to do with these to help you with this classic technique.
Anchoring Your Fingers
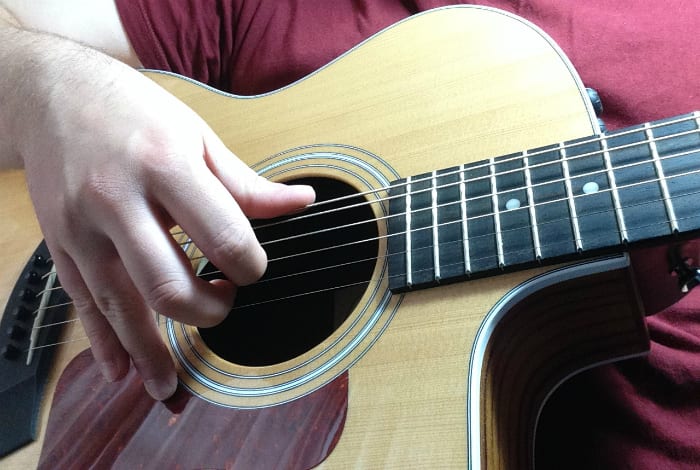
One technique which a lot of players use is an anchoring technique, this is where you use your guitar’s body as a platform to anchor your fingers.
Place your 3rd and 4th fingers on the guitar’s body and try it. This can help with balance.
This is a great technique as it helps you balance between the fingers you’re using on the strings and the fingers you’re not using!
However your fingers may not stretch this far and it just feels too weird for some people, which is why so many guitarists simply HOVER.
Hovering Your Fingers
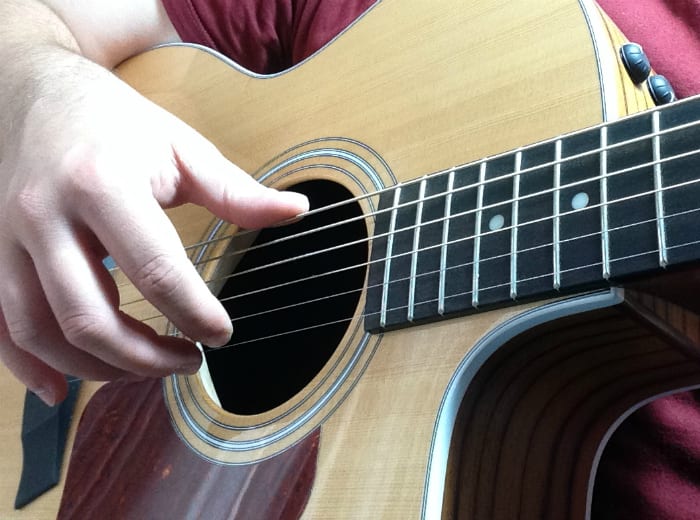
If you 3rd and 4th fingers won’t reach over (or it feels too precarious) you may want to simply hover over the strings, like this:
Even though hovering your fingers can be harder than anchoring them, it can be useful because it means your 3rd and 4th fingers can be used to play extra strings.
Ultimately you have to find what’s best & most comfortable for you so experiment with both these positions and see what feels right.
Learn 12 EASY beginner chords with our popular guide
✅ Stop struggling. Start making music.
✅ Learn beginner-friendly versions of every chord.
This is our most popular guide and it will improve your chord ability quickly! 😎
Get your own personalised guitar-learning plan 🎸
Get a custom guitar-learning plan here: Click here for GuitarMetrics™
World-Class Guitar Courses 🌎
Learn from the world's best guitar educators: Click here for our guitar courses
Fingerstyle Guitar Lessons – Exercise 1
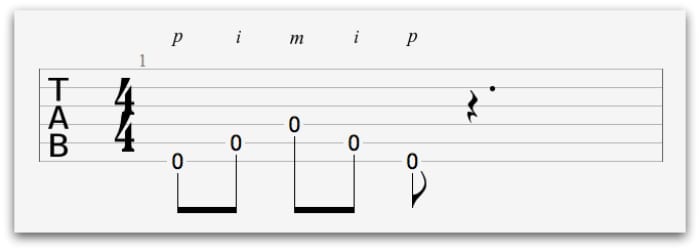
It’s important we get used to the motion of moving our fingers across the strings.
In this first exercise we are going to go between the Low E string, A string and D string using our thumb, first finger and second finger one after the other.
Notice how in the tab there are letters above the tab.
All this means is what fingers you use.
- p=thumb
- i=first finger
- m=middle finger
.
This may seem very simple, but this is a fundamental exercise and picking pattern for all aspects of fingerstyle guitar. Practice this pattern again and again using different chords shapes and see how it sounds.
Action point: Bounce back and forth between Em and G using this pattern.
Fingerstyle Guitar Lessons| #2 Using Your Thumb
The thumb is often neglected by guitar players but it can be an incredibly useful tool for a guitarist.
Using the thumb adds a softer texture to the guitar and can add a lot of dynamic range to your playing.
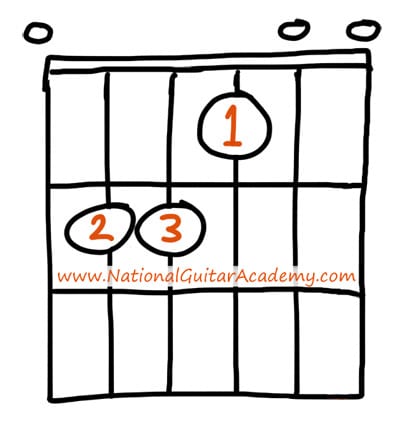
Before we get started let’s pick a chord that we can use throughout all these fingerstyle guitar lessons.
Let’s go with E Major. A fabulous fingerpicking chord as it’s big, bold and we can play all 6 strings.
If you don’t understand how to read chordboxes, read this article of ours.
An E chord should sound like this:
.
If you’d like to know some easier versions of E, check out this lesson: 4 Easy Ways To Play The E Chord On Guitar
We won’t be using any other chords in these fingerstyle guitar lessons, so make sure you have a good grip of this.
Fingerstyle Guitar Lessons – Using Your Thumb
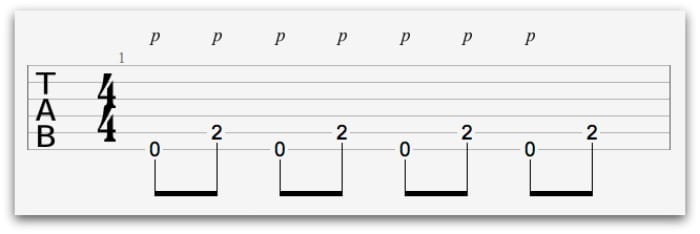
Firstly we’re going to start off with something nice and simple.
All we’re going to do is alternate between the the low E string and the A string.
This is really great is at gets the thumb moving across two strings and is a classic fingerstyle technique.
Note: We are only using the thumb here.
.
Fingerstyle Guitar Lessons – Using Your Thumb – Exercise 2
Now we’re going to strum with our thumb. This can add a soft texture.
All we’re going to do here is simply strum down and up using the side of our thumb, like this:
Fingerstyle Guitar Lessons – Using Your Thumb – Exercise 3
The second exercise we’re going to look at is to add some bass notes to our strumming pattern.
So this time, we’re going to use our thumb to play the E and A strings separately. Whilst in between these notes, we’re going to strum the chord.
It should sound like this:
.
Want free guitar tips and video lessons delivered to your inbox?
Join over 250,000 guitar learners and subscribe to our guitar-tips-by-email service. (It's free.)
We'll send you a series of lessons that will move you to the next level of your guitar journey.
Learn how everything fits together quickly, easily and effectively. We share ninja tips (for instant fun!) but also timeless fundamentals that will deepen your understanding.
Our Guitar Courses
To become a better guitarist click here to see our guitar courses
Get your personalised guitar-learning plan 🎸
Want us to make a guitar-learning plan that is customised to you? Click here for GuitarMetrics™
Wondering what songs to learn on acoustic guitar? Here’s a list of the top 25 best acoustic songs of all time: The 25 best acoustic songs of all time | MusicRadar
Fingerstyle Guitar Lessons #3 – Using Your Thumb And First Finger
Now let’s take a look at using our thumb and our first finger together, adding in the extra finger can be tricky, but don’t worry we’re going to go through a bunch of exercises which will help you tackle this essential technique.
This is classic fingerstyle technique, used in thousands of folk & country songs.
Fingerstyle Guitar Lessons – Thumb And First Finger – Exercise 1
To begin with we’re going to get used to the idea of the thumb and first finger being completely independent of each other.
To do this we’ll be individually picking each string with the thumb and first finger.
Our E, A and D string will be picked with our thumb.
Our G, B and E string will be picked with our first finger.
.
Get our best guitar tips & videos
Where should we send it?
Get our best guitar tips & videos

