A Beginner’s Guide To Playing Ed Sheeran’s Photograph Chords
Want to learn to play Ed Sheeran’s Photograph chords? We’re going to teach you how…
Over 250,000 guitar-learners get our world-class guitar tips & tutorials sent straight to their inbox: Click here to join them
In this free lesson you will learn…
How to palm mute
What accents are and how to use them
A smart alternative to the Bm guitar chord
How to play Ed Sheeran’s Photograph chords
Let’s Learn Ed Sheeran’s Photograph Chords!
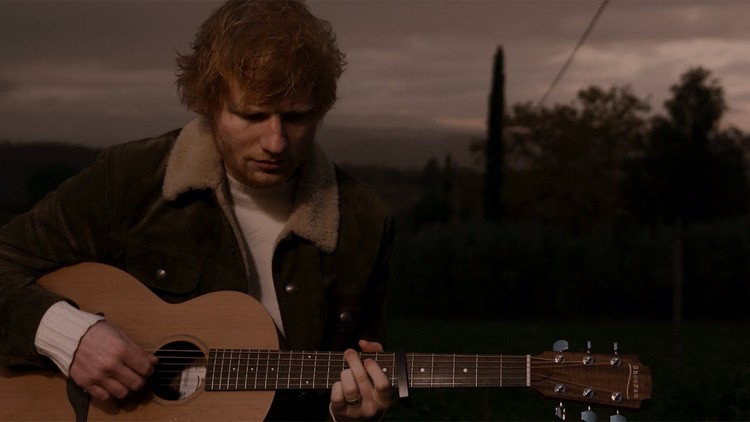
Ed Sheeran has steadily made his mark on the pop music world over the years.
With countless hits under his belt, it’s clear that he’s got an insane amount of talent.
From rock grooves like “Blow” to celtic-inspired folk songs like “I See Fire,” Sheeran really has run the whole gamut when it comes to songwriting.
The Photograph chords are easy to play even as a beginner, and in today’s lesson we’re going to give you an extensive walkthrough of exactly how to play this heartbreakingly beautiful ballad.
We’re going to look at capo positioning, how to play each chord and how to approach the different sections of the song.
Ready? Let’s go.
Some of the best pop songs only contain a few chords, and although they may sound complex from the outside at first listen, many of them are easy to play.
Ed Sheeran’s Photograph chords utilize this strategy of minimalism quite well.
This song sounds huge not because of the guitar itself, but the arrangement surrounding it.
With a great arrangement, we can make even the simplest of chord progressions sound absolutely massive.
Let’s have a listen to that arrangement first, shall we?
Depending upon who you ask around the internet, there are a few ways you could play these chords due to the use of a capo.
For the sake of making the Photograph chords super-easy to play, we’re going to be locking our capo in at the 2nd fret.
This means two things specifically:
Our “open position notes” will change as the capo serves as our open position
We will be referring to the Photograph chords both by the chord shape as well as the chord name.
For example: The first chord of this song uses a D major shape, however the actual chord we are playing will be an E major, as the capo moves our positioning up by two frets.
Capos may seem like an intrusive tool at first, but they help us in a multitude of different ways.
This includes helping us memorize chord shapes in different positions across the fretboard.
If you haven’t used one before, all you have to do is pull the clamp open and lock in straight down the middle of your second fret.
Capos bring out the use of the CAGED system, which teaches us how to master specific chord shapes that can be used repeatedly in different keys across the fretboard.
If you want an in-depth look at the CAGED system before you continue, click here and we’ll talk you through all of it in one lesson.
If you’re ready, we’re ready. Let’s talk a bit about the Photograph chords and how we’ll approach them.
Learn 12 EASY beginner chords with our popular guide
✅ Stop struggling. Start making music.
✅ Learn beginner-friendly versions of every chord.
This is our most popular guide and it will improve your chord ability quickly! 😎
If you’ve got palm muting down and you’re ready to put some chords underneath it, keep scrolling and let’s dive into the D major shape that we’ll be using.
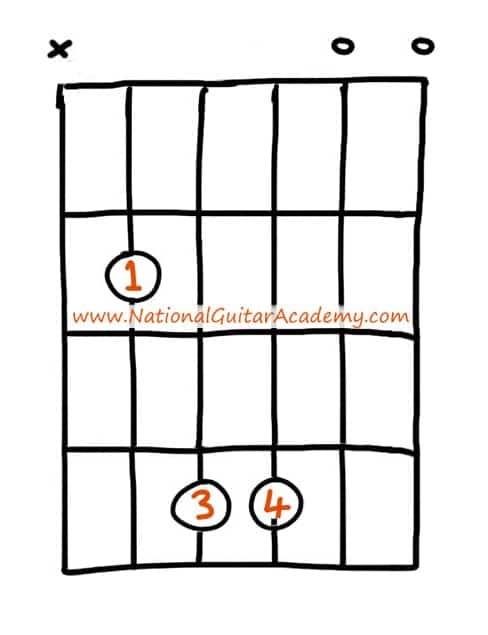
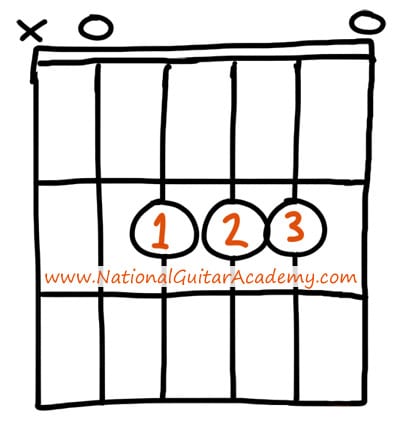
With our capo set at the second fret, let’s start with our first chord – the D major shape (making an E major chord).
We’re only going to need our four thinnest strings (D, G, B, E) for this chord.
Begin with your open D string and add your index finger to the G string at the 4th fret.
Once you’ve done that, add in the ring finger at the 5th fret on the B string, and finally your middle finger on the E string at the 4th fret.
Strum all four strings clearly and you’ve got your first of four Photograph chords done!
Pro Tip: Use arpeggios to check each string individually for whether you are unintentionally muting them or not.
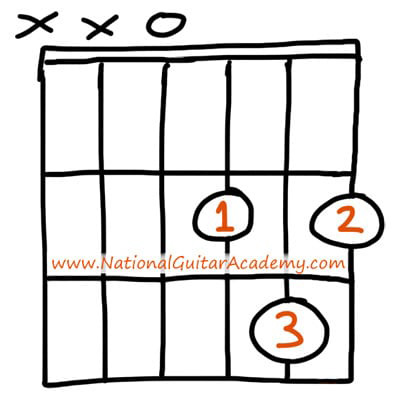
Photograph Chords III – The B Power Chord Shape (C# Power Chord)
Due to the fact that this is a beginner guitar lesson, we’re going to simplify this one a bit.
Typically when you see the transcription for the Photograph chords on a site like Ultimate Guitar, you’ll most likely see it transcribed as a full B minor chord.
But we know some of you aren’t ready to tackle barre chords yet (and that’s okay!), so we’re going to adapt a slightly different version to make it easier.
For the purposes of this lesson, we’re replacing the B minor shape (C# minor chord) with a Bsus4 shape (C#sus4 chord).
All you have to do is make a power chord shape at the fourth fret on the A string of your guitar, and let the B and E strings ring open.
BSUS4
Pro Tip: Make sure to use your index, ring and pinky fingers as it shows in the diagram for this one.
The one catch with this power chord shape is that you’ll have to do a bit of wrist rotation to find the right angle to make the open strings sing without being obstructed by your fret hand.
Pro Tip #2: Take some time to work this out with each of the Photograph chords before you continue to the next. Sounding out chords can be difficult in the beginning, but we won’t master them if we skim over them.
At this time, it’s a good idea to start putting some practice into the mix. Now that we’ve got our D major and Bsus4 shapes down, take a minute to practice the both of them back-to-back with palm muting.
D MAJOR
BSUS4
Photograph Chords IV – The A Major Shape (B Major)
This next one is an easy one that many of you may already know – A major.
Even though this is technically a B major chord, because of the capo we can use the same shape as A major and get away with it with all the same notes.
Convenient, right?
You’re going to need to stack your fingers effectively on one fret for this one, so try this:
E String: Open
B String: Ring finger, fourth fret
G String: Middle finger, fourth fret
D String: Index finger, fourth fret
A String: Open
E String: Mute
Once again, use the rotation of your wrist to allow space for your open strings to ring out.
If you can nail the finger placement, this will be one of the easiest Photograph chords for you to play.
A MAJOR
Although we haven’t gone through the song structure yet, it’s a good idea to practice all of these chords together as we move along.
This gives our hands time to keep up with us and adapt well to new chords as we learn them.
Before we continue on to learning the last of the needed Photograph chords, let’s take a minute to play these three chords one after the other. This will give us a chance to work on movement.
Pro Tip: Use your index finger to lead from one chord to the next in order to make your transitions a bit easier to manage.
D MAJOR
BSUS4
A MAJOR
Photograph Chords V – The G Major Shape (A Major)
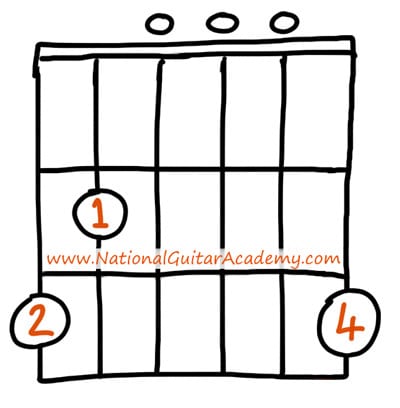
The final of these four chord shapes that we need is a G major shape that gives us the sound of A major with the capo at the second fret.
This is the only one of the Photograph chords that uses all six strings, so we’re going to need to spread our fret hand out a bit more for this last one.
Lead with your middle finger on the low E string at the 5th fret, and build upward.
Add your index finger at the 4th fret on the A string, and leave the two middle strings (D & G) open.
Finally, your ring finger can get added at the fifth fret on the B string, and your pinky finger on the same fret at the high E.
G MAJOR
Arpeggiate the chord, rotate your wrist as needed and let this one sing!
Congrats!
You’ve successfully made it far enough to have mastered all four Photograph chords – that’s awesome! Now it’s time to look at the technical side of things and discuss beat structure and song structure.
In this next section, we’re going to talk about accented beats and why they’re so important to learn about.
From there, we’ll take our newly-learned Photograph chords and put the whole song together, section by section
You’ve come this far – what’s a few more paragraphs?
Keep reading, and in the meantime try playing all four chords in sequence.
D MAJOR
BSUS4
A MAJOR
G MAJOR
Photograph Chords VI – Beat Accents & Palm Muting
This song has a very definite pulse to it, and it’s important to pay attention to that in order to figure out the best way to play along to this tune.
As we discussed above, Ed Sheeran uses palm muting to play through this song.
We’re going to rest the side of our picking hand against the bridge of our guitar to produce a dampened, semi-muted tone. We’re also going to use downpicking to articulate the Photograph chords.
Finally, we need to be mindful of the pacing of the picking pattern.
This song deals with accented and non-accented beats, so let’s look at where we’re going to place our accents.
All that an accented beat is is a beat that is stressed harder than other beats.
Essentially, we just hit the strings a bit harder to stress that particular beat.
Doing this while palm muting is easy – just dig in with your pick on those particular beats and you’ll find yourself pulsing along to the groove in no time.
That’s all we need to know in order to start putting this whole song together, all we need now is to structure our Photograph chords into sections.
Download our lead guitar cheat-sheet to make things easier
It's hard to understand which scales work with which keys.
So we created a cheat-sheet! A key and scale-finder that you can use again and again.
Now that we’ve figured out the fundamentals of this song, it’s time to put it all together.
With our chords at the ready and the beat structure in mind, let’s look at each section.
Give each chord a count of 8 beats like we looked at above.
Keep in mind that we will be listing the chords based on their fundamental shapes, not by their actual chord names.
Intro:
D major – Bsus4 – A major – G major
Verse (begin first chord at the end of “Loving can hurt”):
D major – Bsus4 – A major – G major
D major – Bsus4 – A major – G major
Pre-Chorus:
Bsus4 – G major – D major – A major
Bsus4 – G major – D major – A major (hold last chord)
Chorus (first chord starts at the end of “So you can keep”):
D major – A major – Bsus4 – G major – D major
Bridge: (first chord starts at the end of “And if you hurt”)
D major – A major – Bsus4 – G major
Interlude:
Bsus4 – G major – D major – A major
Outro:
D major – A major – Bsus4 – G major
D major – A major – Bsus4 – G major – G major (hold until the end)
Notice how many variations Ed Sheeran uses on these four Photograph chords?
One of the huge perks of this song is that it gives us huge insight into all the ways we can mix up four chords in new ways to create different song sections.
Photograph Chords VIII – Song Structure
Let’s quickly break down the structure of the whole song by sections, so we know which progressions to come back to and when.
Use the section above to reference what Photograph chords to play where!
Here’s the whole song, section by section:
Intro
Verse
Pre-Chorus
Chorus
Verse
Pre-Chorus
Chorus
Bridge
Interlude
With that, friends, this concludes our lesson on how to play Ed Sheeran’s Photograph chords!
Remember to prioritize downstrokes and palm muting as well as proper beat accents in order to make the most out of these four versatile chords.
The only thing left to do is practice, so get to it!
Pro Tip: It’s always worth singing along to a song as you learn it in order to place the chords in their most appropriate spot. If you don’t feel like singing, you can always hum too.
Take These Photograph Chords & Use Them Elsewhere
You’ll find very quickly that these chord shapes are found everywhere in popular music, and so it’s important to hang on to them for future reference.
Make a point of practicing these Photograph chords regularly to perfect your transitions from one to the next.
All things become easier the more we practice, so stay on the guitar grind!
Recommended Resources
If you enjoyed this lesson on learning Ed Sheeran’s Photograph chords, you’ll love everything else we’ve got in store for you below:
Want free guitar tips and video lessons delivered to your inbox?
Join over 250,000 other guitar learners and subscribe to our guitar-tips-by-email service. (It's free.)
We'll send you a series of lessons that will move you to the next level of your guitar journey.
Learn how everything fits together quickly, easily and effectively. We share ninja tips (for instant fun!) but also timeless fundamentals that will deepen your understanding.