Looking for slide guitar lessons? You’re in the right place!
In this free guitar lesson, you will learn:
- Slide guitar fundamentals; what slide guitar is, how to hold a guitar slide and how to sound epic.
- 2 super-cool guitar licks.
- The no1 secret slide tuning which will make you sound amazing.
Over 100,000 guitar-learners get our world-class guitar tips & tutorials sent straight to their inbox:
Click here to join them Get our best guitar tips & videos
Slide Guitar Lessons #1 What Is Slide Guitar?
Slide guitar is a type of guitar playing where instead of creating notes by pressing the strings against the frets, we create notes by running a slide across the strings.
Slide guitar sounds awesome in styles of music such as blues and country, but it is by no means limited to those styles.
Slides are sometimes also called bottlenecks, because the original slides were made from old bottlenecks, but now-a-days, as well as glass slides you can get metal slides and ceramic slides.
Health & safety tip: do NOT attempt to make your own slide using an old bottle neck unless you have the necessary professional skills and equipment. Broken glass is sharp and dangerous.
Slide Guitar Lessons #2 How To Hold A Guitar Slide
If we’re going to make some cool sounds with our guitar slide, we need to make sure we’re holding it correctly.
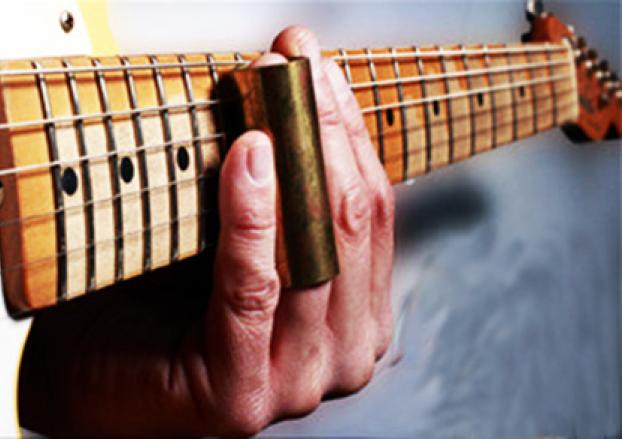
Different players prefer putting their slide onto different fingers. Most commonly you’ll see slide guitarists with their slide on either their third (ring) finger or their fourth (pinky) finger.
In our opinion, the fourth finger is the best finger to wear the slide on as it leaves the rest of the fingers free to do other things like form chords.
Whichever finger you choose to use, you need to make sure you keep it straight.
It’s almost instinctive for us guitarists to want to bend our fingers in order to fret notes, but slide guitar is a very different ball-game.
You may find the slide clattering against the fretboard of the guitar when you begin as your finger instinctively tries to bend.
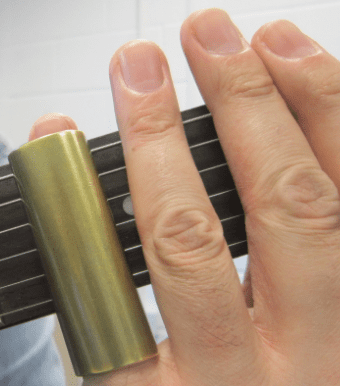
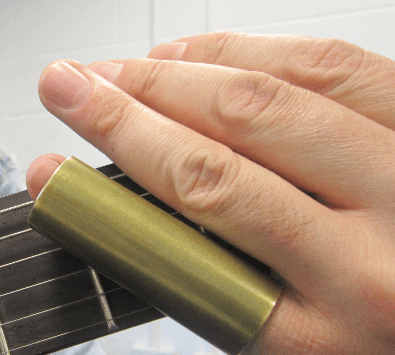
If this is the case, try to relax your hand and allow your finger to stay straight. Ideally we want to line the slide up so it’s perpendicular to the strings.
Like this:
Not like this:
We also want to lightly touch the strings behind the slide using the spare fingers. This is so we only produce one note from each string. Without dampening the strings behind the slide we can end up with an extra note that will most likely clash with our desired note.
It's hard to understand which scales work with which keys.
So we created a cheat-sheet! A key and scale-finder that you can use again and again. Get a custom guitar-learning plan here: Click here for GuitarMetrics™ Learn from the world's best guitar educators: Click here for our guitar coursesDownload our lead guitar cheat-sheet to make things easier
Get your personalised guitar-learning plan 🎸
World-Class Guitar Courses 🌎
Slide Guitar Lessons #4 Getting The Picking Hand In Position
Ideally, to attempt slide guitar, we need to already have a basic grasp of finger-picking on guitar.
If you’re new to finger-picking, go here: Fingerstyle Guitar Lessons – 5 Easy Ways To Sound Amazing
You could also use a thumb pick when playing slide guitar.
With slide guitar, we need the picking hand to be very very controlled. We won’t just be picking strings with it. We’ll also be muting them with it.
The simplest rule to follow is: keep the heel of your hand on the bridge of the guitar and just slightly on the strings, so they’re all palm muted.
You should be able to strum across all six-strings from this position with a simple arc-motion from your thumb and all the strings should sound muted.
Here’s a demonstration video:
Practice a few times until you can do it comfortably.
Want free guitar tips and video lessons delivered to your inbox?
Join over 100,000 guitar learners and subscribe to our guitar-tips-by-email service. (It's free.)
We'll send you a series of lessons that will move you to the next level of your guitar journey.
Learn how everything fits together quickly, easily and effectively. We share ninja tips (for instant fun!) but also timeless fundamentals that will deepen your understanding.


Get our best guitar tips & videos
Our Guitar Courses
To become a better guitarist click here to see our guitar courses
Get your personalised guitar-learning plan 🎸
Want us to make a guitar-learning plan that is customised to you? Click here for GuitarMetrics™
Slide Guitar Lessons #3 Basic E Blues
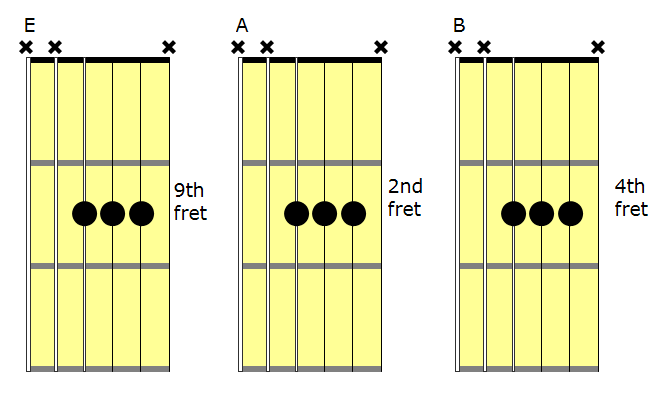
Before we try anything complicated with slide guitar, we want to make sure we can produce some nice clean ‘A shaped’ chords using the slide.
First things first, let’s put down our slides and just make sure we have these chord shapes sorted.
Our chords are E, A and B. But we want to use our ‘A shape’ for all of them.
Like this:
(If you don't understand the above image please read our article "How To Read Guitar Chordboxes In 60 Seconds". It will make everything clear!)
You should play all three of these chords using one finger (ie. a barre) and make sure you only play the fretted notes. No open strings.
Here’s the twelve bar blues sequence, just in case you’re unfamiliar with it.
| E | | | |
| A | |E | |
|B | A | E | B |
Before you even think about using a slide to play this sequence, you first need to be able to play it competently using just a one finger barre.
You don’t want to be “umming and ahhing” about which chord comes next while also trying to figure out how to use the slide.
Make life easy on yourself and make sure you know the sequence.
With the picking hand…
Use the thumb to pluck the fourth string (the D string), the index finger to pluck the third string (the G string) and the middle finger to pluck the second string (the B string).
Don’t lift the heel of your hand off the bridge.
Use the joints of your fingers to make the plucking motion, not your entire arm.
Here’s a demonstration video to help you:
Now, let’s bring the slide into play
So, if you’re now totally happy that you know the chords, know the sequence and know what you’re doing with your picking hand, it’s time to bring the slide into play.
Instead of barring these chords down, we’re going to use the slide.
It’s important to note something here though:
We are not pressing the strings against the frets using the slide.
This cannot be stressed enough. What we’re actually doing is gently touching the strings directly over the fret with the slide.
- You must place your slide directly over the fret. NOT over the wood of the fretboard where we’d normally fret a note.
The strings should not make any contact whatsoever with the frets or the fretboard when they are being played with a slide.
In slide guitar, the frets serve merely as markers to tell us where we are. They play no part in the creation of the notes we play.
Let’s try this.
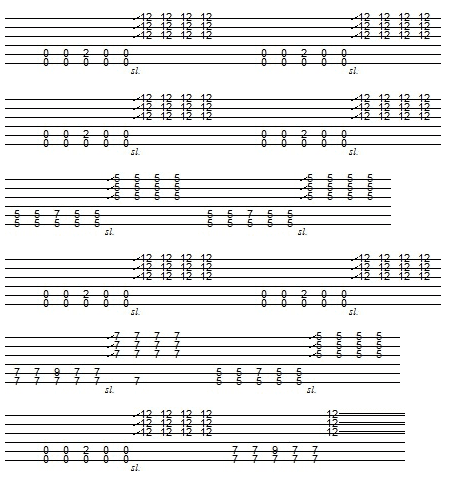
We want to play the E blues sequence again, but using the slide.
Here’s a demonstration video to help you along:
Spend as much time as you need on this exercise.
Don’t rush onto anything more advanced until you’re totally happy with this.
Slide Guitar Lessons #4 Slide guitar in open D tuning
Open chord tunings are great for slide guitar playing.
Although a lot of people probably think of retuning their guitar as a bit of a fuss, once we’re in an open tuning playing slide guitar can be a great deal easier.
The tuning we’re going to use is: open D.
Open D tuning is (from low to high):
- D. (6th string.)
- A. (5th string.)
- D. (4th string.)
- F#. (3rd string.)
- A. (2nd string.)
- D. (1st string.)
Here’s the exercise we’re going to try:
And here’s a video to help you along:
Much like with the previous exercise, take your time and make sure you’re completely happy with this one before attempting anything more advanced.
✅ Stop struggling. Start making music. ✅ Learn beginner-friendly versions of every chord. This is our most popular guide and it will improve your chord ability quickly! 😎 Get a custom guitar-learning plan here: Click here for GuitarMetrics™ Learn from the world's best guitar educators: Click here for our guitar coursesLearn 12 EASY beginner chords with our popular guide
Where should we send it?
Get your own personalised guitar-learning plan 🎸
World-Class Guitar Courses 🌎
Slide Guitar Lessons #5 Single string phrases
Isolating single strings when playing slide guitar can be quite tricky, but it’s by no means impossible.
This is where all this muting we’ve been talking about really becomes important.
It’s vital that we mute:
- Behind the slide using our spare fingers
- And where the strings meet the bridge using our picking hand
This is how we dull out those unwanted strings.
Here’s a cool slide lick for you to try out. It’s also in open D tuning.
And here’s a video demonstration of it:
It’s important to remember though that the most fun can be had as a slide guitarist when improvising and experimenting.
Don’t get too caught up in learning exercises from tabs. Take these techniques and see what you can do with them.
Take our 60-second quiz & get your results: Take The Quiz Click here to learn more about National Guitar Academy membership Look cooler! Check out our merch: Click here to see our merch store Join over 100,000 guitar-learners and subscribe to our guitar-tips-by-email service. (It's free.) We'll send you a series of lessons that will move you to the next level of your guitar journey. Learn how everything fits together quickly, easily and effectively. We share ninja tips (for instant fun!) but also timeless fundamentals that will deepen your understanding.What Type of Guitarist Are You?
Join the world's best online guitar school 🌎

Cool Guitar T-shirts 😎
Want free guitar tips and video lessons delivered to your inbox?


Get our best guitar tips & videos
How To Learn Guitar: An 11-Step Programme For Beginners How To Choose The Perfect Beginner Guitar Learn about National Guitar Academy: About Us Join us on Facebook for daily guitar tips. Listen to our Learn Guitar Podcast for rapid guitar progress. Check out our free chord lessons.Popular Lessons
More Cool Guitar Stuff

