Learning how to strum a guitar correctly should be the number 1 goal of a guitar beginner. Learning chords is important, but they’re just static shapes.
Learning how to strum a guitar is how we make MUSIC.
In this free guitar lesson you will learn:
- How to inject musicality and rhythm into your strumming.
- The step-by-step strumming method that works on every song.
- 3 posture tips that make strumming easy.
- The 2 secrets to perfect strumming technique.
- How to position your wrist, fingers and forearm for effortless strumming.
- The 5 fundamentals that must be in place for you to learn how to strum a guitar.
- You’ll also see a video, from the player’s perspective, of what good strumming technique looks like.
Sound good? Let’s dive in.
Over 100,000 guitar-learners get our world-class guitar tips & tutorials sent straight to their inbox: Click here to join them

Why is strumming technique so important?
I’ve spent over 20,000 hours of my life teaching people how to strum a guitar. It’s been a blessing, I’ve loved it. I’ve learned a lot about myself and others during those hours. One of the things I’ve learned is that everyone gets comfortable with chords in the end.
(Even the most clumsy-fingered people, so if you’re in this camp don’t worry.)
If you practice enough, chords will not be a problem…
But strumming is a much more nuanced thing. It requires subtlety, deftness and feel.
- Your chord hand holds a shape.
- Your strumming hand makes MUSIC.
So let’s be clear about the size of the challenge before we begin:
In many ways, understanding how to strum a guitar IS learning how to play guitar. Great strumming = great rhythm guitarist.
This is how we create rhythm. This is how we bring chords to life and how we create a groove. This is how we make music.
There is a huge reward waiting for you if you get this right! 🙂
In this lesson, I’ll give you my very best tips for how to strum a guitar correctly.

The fundamentals must be in place
We need to make sure the fundamentals are in place first. (If they’re not, you will never learn how to strum a guitar properly.)
If you don’t know how to strum a guitar and you’ve been playing for a while, you should read this first section carefully as there’s obviously been something holding you back thus far.
You will be tempted to skip this stuff and fast-forward to the ‘tips and tricks’. Resist that urge! The fundamentals must be in place.
Guitar fundamentals: Learn with a suitable guitar
Make sure that you’re using a guitar that’s well-suited to your body size and shape.
For example, if you’re petite, you shouldn’t be using a jumbo or dreadnought guitar. (If you want to learn how to strum a guitar, you must be able to comfortably reach over the instrument.)
If your guitar is badly-suited to your body size and shape you will find it significantly harder to learn how to strum a guitar properly.
To learn more about this (the most fundamental of all fundamentals!), read my article:
Learn 12 EASY beginner chords with our popular guide
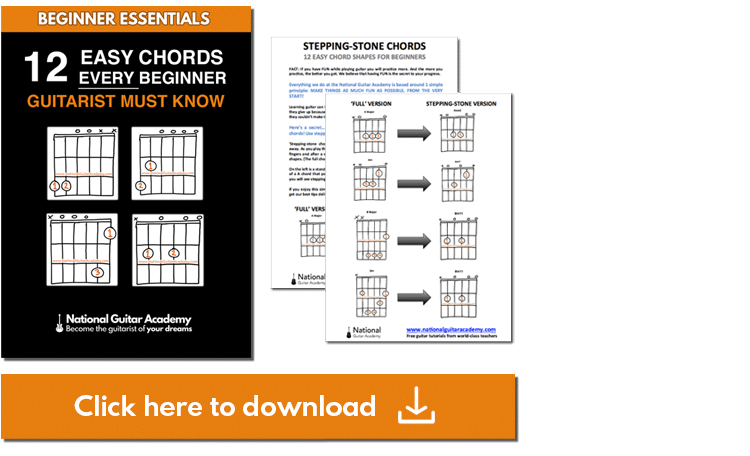
✅ Stop struggling. Start making music.
✅ Learn beginner-friendly versions of every chord.
This is our most popular guide and it will improve your chord ability quickly! 😎
Get your own personalised guitar-learning plan 🎸
Get a custom guitar-learning plan here: Click here for GuitarMetrics™
World-Class Guitar Courses 🌎
Learn from the world's best guitar educators: Click here for our guitar courses
Guitar fundamentals: Use extra light gauge strings
If you want to learn how to strum a guitar you better make sure you have extra light gauge strings on your axe. They make life a lot easier for beginners.
They help you strum better because it’s easier to make chords with this type of string. This frees you up to focus more on your strumming.
Your local guitar shop will re-string your guitar for you for $10 / £10. This is low hanging-fruit and will make things easier immediately. Do it!
Want to learn more about guitar string gauges? Click here!
Guitar fundamentals: The All-Conquering Importance of Posture
Posture is the least ‘sexy’ element of learning guitar and it’s also the most important.
If there are errors in your posture you will never learn how to strum a guitar properly.
I cover this in detail elsewhere, but here’s a few quick pointers:
The Thing-You-Sit-On is absolutely vital.
- Don’t slump down into a cushioned sofa.
- Don’t sit in a chair with arms. This inhibits your movement.
- Don’t perch on a stool at the kitchen island. (The guitar will slide away from you as you play.)
What to do with your thighs and arms
Sit on whatever you want, but make sure these things are in place:
- Your thigh should be at a 90 degree angle to your torso, or angled ever so slightly towards you. This makes the guitar ‘secure’ and reduces the likelihood of it moving away mid-strum.
- Both arms should be completely free from obstruction. Chord changes become easier when people realize that they need to move their whole left arm and not just the fingers on their left hand.
Your left wrist should move around as you change chords. Forwards, backwards and side-to-side, as needed, to make your chord transitions easier.
- Do not tuck your left elbow into your stomach or rest it on your thigh. Your left elbow should be free-floating in mid-air. (This is what allows your left wrist to move around!) If you can’t move your left wrist around you are trying to change chords while tied to a ball and chain.
I see people make these mistakes again and again. These mistakes make learning how to strum a guitar a lot harder (and in some cases physically impossible).
Carefully check your technique and watch for these strum-killers creeping in.
Want free guitar tips and video lessons delivered to your inbox?
Join over 100,000 guitar learners and subscribe to our guitar-tips-by-email service. (It's free.)
We'll send you a series of lessons that will move you to the next level of your guitar journey.
Learn how everything fits together quickly, easily and effectively. We share ninja tips (for instant fun!) but also timeless fundamentals that will deepen your understanding.

Our Guitar Courses
To become a better guitarist click here to see our guitar courses
Get your personalised guitar-learning plan 🎸
Want us to make a guitar-learning plan that is customised to you? Click here for GuitarMetrics™
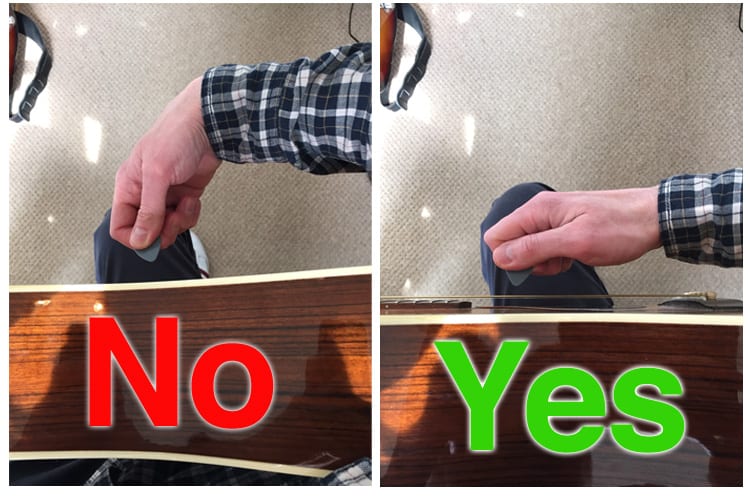
What To Do With Your Strumming Arm
Firstly, have your right elbow in front of the ridge at the top of the guitar body. It doesn’t have to be in front of the guitar body, it just needs to have passed the ridgeline on the top of the guitar’s body.
If you want to learn how to strum a guitar your elbow can’t sit on top of the roof of the guitar’s body. That’s your main strumming hinge! It must be in front of the guitar otherwise it can’t pivot.
Don’t bend your wrist in towards the guitar
Don’t bend your wrist in towards the guitar. This swan-neck shape is a bonafide strum-killer because it creates extra points of movement that make it very hard to create a consistent strum.
If you do this you are asking your joints to perform an impossible task.
Your wrist should continue in a straight line, along from your forearm.
- Don’t strum from your wrist, or rotate your wrist.
- Lock your wrist and strum from your elbow.
If you want to learn how to strum a guitar you must learn to strum with your whole forearm. We want big, bold arm movements from your elbow (not timid twiddling from your wrist).
This is a key point: If you want to learn how to strum a guitar you must learn to strum with your whole forearm. Straighten your wrist. Lock your wrist. Strum from your elbow.
Use A Pick / Plectrum
Picks and plectrums are the same thing. If you want to learn how to strum a guitar you should use a pick.
It’s possible to learn how to strum a guitar without using a pick, but I’d estimate it’s about 50%-60% harder. Using a pick feels weird for the first hour or so, but it makes everything easier thereafter.
Using a pick is a progress accelerator.
I encourage all my students to learn to play with their fingers too. (I mostly play with my fingers.) But in the early days, I encourage them to use a pick as their default strumming tool.
I sometimes get strong resistance from students when I suggest this. They say “I want to use my fingers, the pick doesn’t feel right”, that type of thing.
Well that’s fine, do whatever you want! Just understand that it’s significantly more difficult for a beginner to learn how to strum a guitar in a fluid and musical way using fingers.
.

Common pick errors
A common beginner mistake is to use a pick that’s too thick. This makes it harder to strum and is the main reason some beginners reject using a pick.
There’s a huge range of thicknesses to choose from. Beginners should use something between 0.65-0.73.
- Any thicker than that and the pick will feel too stiff. It will feel too rigid, like there’s a ‘barrier’ between you and the guitar.
- Any thinner that that and it will be too pliable and ‘flappy’. You won’t feel ‘connected’ the guitar.
We’re seeking a happy medium that gives you control and connection.
In my experience 0.65-0.73 is the sweet spot for beginners who want to learn how to strum a guitar fluidly.
How to hold a guitar pick
Hold the pick between your first finger and thumb. Tuck your other fingers in.
Hold the pick inwards. Your wrist should be straight, running parallel with the guitar neck, but the pick should be aimed in at the strings.
It should look something like this:
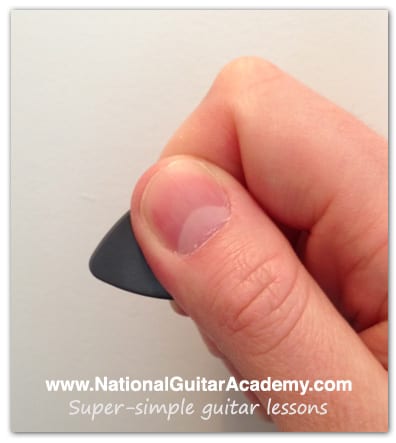
Don’t have your lower fingers outstretched and flapping around. (They’ll catch on the strings and deaden notes accidentally, but most of all, it’s a bad habit that will cause you problems later on. It’ll make it harder to do things like palm-muting.)
We don’t want bad technique taking root. Tuck those fingers in and keep your fist nice and compact!
How to strum a guitar from the player’s perspective
This video will show you how to strum a guitar from the player’s perspective. Your strumming hand should look something like this:
- Notice that the wrist is locked and the motion is mostly coming from the elbow.
- Check out the way the pick is being held too.
- The whole arm is a pivot. Think of it as a single piece of wood!
- The pick is like a nail through the piece of wood, at the end. Pointing in, at the strings.
This may all sound very solid and ‘unmusical’, but the exact opposite is true. This setup gives you an extremely predictable strumming technique which means you can drench your strumming with right-hand techniques and musicality.
With this consistency of technique it becomes easy to stay in time and on-the-beat, to add palm-muting, syncopation & deadening. Best of all, it’s pretty easy to replicate.
If you want to learn how to strum a guitar, copy the above video!
If your current strumming technique is very different to this, you will initially feel like you’re ‘dragging’ the pick over the strings when you try this. (And you are, that’s the pick’s job! That’s what it’s meant to do.)
This ‘feeling’ can cause a bit of discomfort, but it will pass quickly. 🙂

Avoid ‘Thumb Plague’
If you want to learn how to strum a guitar I flat out forbid you from ever strumming with your thumb!
(This is the most limiting bad habit I know of. There are dozens of negatives and literally no upside.)
Seriously, if you value your future as a guitarist don’t do this. It will cripple your guitar technique. (You are not Jeff Beck!)
If you like the ‘soft’ tone from using your thumb, try using a more flexible pick than you’ve used in the past. Or try lighter strings. Or try strumming with your fingers or fingerpicking.
Basically do anything other than strum with your thumb! 🙂
If you want to learn how to strum a guitar make sure you’re practicing EASY songs.
It’s almost impossible to truly focus on your strumming when you’re struggling with chord changes at the other end of the guitar neck.
When you want to double-down and learn how to strum a guitar with high musicality, you should play songs with SUPER-easy chords.
This allows you to commit maximum attention to your strumming hand.
Read this article that Jack and I wrote:

Understand the huge difference between downstrokes and upstrokes
For lots of people this is a game-changing concept. I hope it helps you too. 🙂
- Downstrokes are the main stroke. Downstrokes drive the song forward. They are almost always ON the beat of the song.
- Upstrokes are ‘filler’ They don’t matter as much as downstrokes. They are usually OFF the beat of the song.
When strumming downstokes you should aim to strum all of the strings that the chord requires (4, 5 or 6 strings).
When strumming upstrokes you only need to strum the first 2 or 3 strings. (The thinnest strings.)
If you strum upstrokes the same way you strum downstrokes your playing will sound very severe and robotic.
You need to let things breathe more. We create this ‘space’ in our strumming by reducing (or omitting) upstrokes.
We can’t do this with downstrokes, they are too important, they drive the song forward.
An upstroke is not a mirror image of a downstroke. They are two different things. They serve different roles.
This is mind-blowing for most guitar-learners and you will initially struggle to implement this in your strumming because you’ll probably be used to moving back and forth over the strings like a piston. Down, up, down, up, same, same, just in opposite directions.
If you want to learn how to strum a guitar then you need to make some changes to your existing technique.
An old boss of mine used to say: “If you always do what you always did, you’ll always get what you always got”. Very true!
It’s likely that a little surgery is required in your technique. And, this is probably the most fundamental thing you need to change.
You only need to catch 2-3 strings with your upstrokes.

Exploding the myth of ‘the strumming pattern’
One of the most limiting beliefs that guitar learners adopt is the idea that there is a ‘strumming pattern’ to every song.
Forget about ‘strumming patterns’.
We want you to develop a sense of musicality and expression in your play. How does learning a bespoke ‘strumming pattern’ for 1 song help you prepare for a million different songs?
I don’t want you to learn rote. I want you to learn how to be musical. So forget the YouTube gurus (most of whom are guitarists and not guitar teachers), trust me on this crucial point.
Forget all about strumming patterns and all that ‘down, down, up, down up, up, down, up, up’ stuff! 🙂
The strumming pattern is only ever: down up, down up.
That’s all it ever is and all it ever will be.
Sure, we sometimes miss some out, play some louder than others, play more strings than others, but that’s all at your discretion as a musician who is interpreting a song.
You may want to play the song powerfully, or gently, you may want to treat it as a rock ballad or a fingerpicked folk track.
Forget strumming patterns. They encourage you to learn rote and to learn in a stilted and robotic way. That is the very antithesis of what this should be.
.
Now for some guitar learners, they don’t want to hear this. They want something concrete they can work to and try to copy. I understand that. I’ve walked through this process with hundreds of people.
For beginners who want something clear they can copy, I recommend they learn my ‘universal strumming pattern’. This gets you strumming in the right way, allows you to sound great now and EMPOWERS you for the future.
Let’s check it out.

Learn The Universal Strumming Pattern
I call this the ‘universal strumming pattern’ because it works on every song. (Yes, every single song!)
There’s four steps to this:
- Step 1) Identify the beat of the track.
- Step 2) Play one downstroke on each beat.
- Step 3) Add an upstroke in-between each downstroke.
- Step 4) Double the speed. (THIS IS OPTIONAL and not always needed.)
Let’s break it down.
Step 1) Identify the beat of the track.
Some people ‘get’ this immediately and some people find it super-hard.
If you want to learn how to strum a guitar with fluidity, you MUST be able to identify the beat of a song.
For most people, this explanation will suffice:
“The beat of the song is how you’d tap your feet along to the song. Or how you’d clap your hands. It’s a regular beat.”
- The beat of a song is ALWAYS: tap, tap, tap, tap
- It’s never: Tap, tap, tappety, tappety, tap, tap, <pause>, tap, tap.
- There are no pauses. This is a regular beat. There is the same amount of time between each and every beat.
If you’re struggling to find the beat of the song listen to the drums and bass guitar. It may take you a little while, but you’ll find it. Listen for the snare drum.
The speed of a song’s beat is measured with ‘tempo’ in BPM which stands for Beats Per Minute.
If all else fails, Google it!
Eg: “Tempo of Hotel California”
When you have the tempo in BPM, you can enter it into a metronome. There’s tons of these online, but I tell my students to use the smartphone app ‘Metrotimer’.

There’s dozens of apps that do the same job. You enter the BPM and it plays a click track you can strum along to to stay in time.
I strongly encourage you to try and FEEL the beat and not get too scientific about this process. We want you to learn how to strum a guitar without using any tools and the vast majority of people achieve this.
However, I’ve included the stuff here about BPM and metronomes because I know that about 2% of people literally have zero sense of timing.
The vast majority of people can figure the beat of a song out without having to forensically break it down as I’ve shown here.
Even so, going through this process at least once or twice will help deepen your understanding of music, so give it a whirl! 🙂
Take some time to develop your FEEL of music by identifying the beat of different songs, across different genres.
This is a learned skill and I guarantee you will get better at it as you practice.
Ok, so however you figured it out, you have now identified the beat of the song. Let’s move onto step 2:

Step 2) Play one downstroke on each beat.
This is the easiest step of all. Simply play one downstroke on each beat. That’s it. On every beat play a downstroke. Strum all the strings the chord requires.
If the BPM of a song is 120, you should strum 120 downstrokes per minute.
Tap your foot as you play to help ‘ground’ you in the timing of the track.
Get this established before introducing step 3.
Step 3) Add an upstroke in-between each downstroke.
This is the hardest step and the most important moment when learning how to strum a guitar.
Most people find step 2 easy, but fall OUT of time when they add the upstrokes in. (Most people start replacing downstrokes with upstrokes here, but that’s not what we want.)
The key point here is this: We don’t want your hand to strum any faster (or slower) than it was in step 2. We aren’t changing the speed. All we are doing here is ADDING upstrokes in to what was already established in step 2.
We are not replacing any downstrokes with upstrokes here. We are adding upstrokes.
This will take practice. This is the very heart of the issue. Remember this: when you crack this (and you will), the world is your oyster! You will be able to strum ANY song. This strumming pattern works on every song.

OPTIONAL Step 4) Double the speed.
Most of the time, you won’t need this last step. But depending on how you identified the beat or what type of song it is (eg, a folk ballad vs a punk rock thrash), your strumming may sound too slow, or too sparse.
If this happens you simply need to double the speed. Don’t go ‘a bit’ faster. Exactly double it. Use the metronome if needs be.
You can tap your current beat into the metronome and it will show you your current BPM. If it tells you you’re currently working to 70 BPM then you know you need to go to 140 BPM.
If possible, I would much prefer you did this by ear and feel. We want you to internalise how to strum a guitar.
For example: “1-and-2-and-3-and-4” would become “1, 2, 3, 4, 5, 6, 7, 8”.
Most of the time, you won’t need step 4.
Example of the universal strumming pattern in action
I recorded a short clip for you so you can hear this method being applied with a real track.
Sometimes a real example can explain how to strum a guitar better than a thousand words. Hit play!
.
Now give it a try yourself. Play along! 🙂
.
- The chords to this track are C#, B, F#, C#, but they will probably be too hard for you to play so we need to make it easier using a capo. (You do own a capo don’t you!? I hope so, these are a beginner guitarist’s best friend. This is my favourite capo.)
- Put a capo on the 4th fret and play A, G, D, A. (Or if you prefer, put a capo on the 1st fret and play C, Bb, F, C. I think this voicing sounds a bit better.)
- If you don’t have a capo you can still do the exercise, but it will sound different to the original recording as you will be playing in a different key. Without a capo, you should play D, C, G, D.
Congratulations!
You wanted to learn how to strum a guitar and you now know how to strum ANY song!
Sure, there will be tons of ways you can adapt and customize your song (or any song), but you now have something that will at least work on any song.
Once you get comfortable with the universal strumming pattern you can start to experiment and feel free to develop, safe in the knowledge you can ‘fall back’ to this as a default safety option.
Adding a little garnish…
Now we’ve covered how to strum a guitar consistently, let’s look at a couple of ways we can learn how to strum a guitar in a more advanced style.
One of the first things I’d suggest you try adding to this is missing out the first upstroke on each new chord.
So instead of:
“down, up, down, up, down, up”
You play:
“ down, down, up, down, up”.
Missing out the first upstroke of each new chord ‘defines’ the chord progression and makes your progress through the song clear and satisfying. Try it. You’ll hear what I mean.
Can you hear that it ‘announces’ the arrival of a new chord? It’s a subtle thing, but it adds a bit of polish to your strumming. Pretty cool! 🙂

A pro tip: “String Grouping” while strumming
Before we finish I want to share a ninja technique with you that will help you learn how to strum a guitar with much more musicality.
This may be too advanced for you at this stage, but I’d like to at least put it on your radar for future reference.
You don’t always have to play all the strings of a chord.
Think of your 6 guitar strings being in 3 segments: Low, Mid and High.
Pick a 6-string chord (eg, a G or E chord). And listen to how different the lowest 2 strings sound to the highest 2 strings and the middle two.
These are your RANGE as a rhythm guitarist.
To make your strumming sound varied, expressive, interesting and musical you must bring out the full range in your play.
Don’t just bash 6-strings, 6-strings, 6-strings, 6-strings, every time. Give us 2-low, 2-high, 2-low, 2-high, then drop 2-mid in there to balance it out.
Within a chord, you have other chords.
You won’t master this overnight, but by being aware of this you can start to emphasise the lower or higher strings from time to time. This is a fabulous way to learn how to strum a guitar in a more advanced way.
This will give you more range and subtlety and you’ll bring out natural harmonics that are lost when you simply bash 6-strings. This will transform your musicality.
This, along with the other tips we’ve covered today, will really help you if your playing has sounded too robotic.
People around you will notice how much better you sound after you implement the techniques we’ve covered in this lesson. Let’s quickly review a few of the key points:
How to strum a guitar – a quick summary:
- Your posture is KING.
- The Thing You Sit On is important.
- Lock your wrist and strum from your elbow.
- Use a pick. Use a pick. Use a pick.
- Downstrokes and upstrokes are different things. You only need to catch 2-3 strings with your upstrokes.
- Use the universal strumming pattern. It works on every song.
- Use ‘string grouping’ to drench your strumming in musicality.
What Type of Guitarist Are You?
Take our 60-second quiz & get your results: Take The Quiz
Join the world's best online guitar school 🌎
- Get your own personalised guitar learning plan (customised just for YOU).
- World-class online guitar courses. Learn at your own pace.
- Community Campus & Learning Forum - A friendly community! Connect with our team & students. 😊
- Beginner Song library with chordsheets, tabs and tips. (Songs suitable for all levels!)
- Regular live streams, seminars and Q&A sessions - Learn from world-class guitar educators. Get all your questions answered!
Click here to learn more about National Guitar Academy membership ![]()
Cool Guitar T-shirts 😎
Look cooler! Check out our merch: Click here to see our merch store
Want free guitar tips and video lessons delivered to your inbox?
Join over 100,000 guitar-learners and subscribe to our guitar-tips-by-email service. (It's free.)
We'll send you a series of lessons that will move you to the next level of your guitar journey.
Learn how everything fits together quickly, easily and effectively. We share ninja tips (for instant fun!) but also timeless fundamentals that will deepen your understanding.

Popular Lessons
How To Learn Guitar: An 11-Step Programme For Beginners
How To Choose The Perfect Beginner Guitar
More Cool Guitar Stuff
Learn about National Guitar Academy: About Us
Join us on Facebook for daily guitar tips.
Listen to our Learn Guitar Podcast for rapid guitar progress.
Check out our free chord lessons.
Get our best guitar tips & videos
Where should we send it?
Get our best guitar tips & videos