If you’re a fan of Merle Travis, you’re going to want to learn how to crack into his world-renowned guitar technique – Dive in with us on this travis picking lesson for beginners!
Over 100,000 guitar-learners get our world-class guitar tips & tutorials sent straight to their inbox: Click here to join them
In this free lesson you will learn…
- What travis picking is
- Who Merle Travis was to the guitar world
- How to tighten up this technique
- What “syncopation” is and how to do it
- A cool 2-chord progression to practice with
Who’s Ready For Their First Travis Picking Lesson?
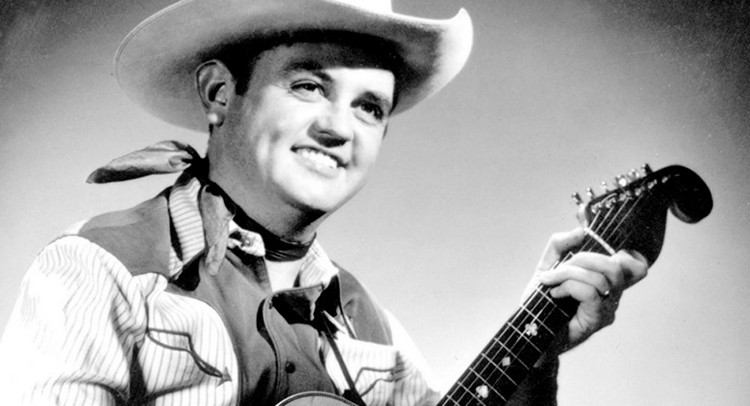
Merle Travis was a legendary guitarist who pioneered an incredibly clever style of guitar playing, later dubbed “Travis Picking.”
This famed approach to the guitar involves using one’s thumb to simulate the presence of a bass player playing a walking bass line that accents the lowest notes in each chord.
Guitarists all over have spent years studying Travis’ famous approach to the guitar, and for good reason:
Musically, it makes a lot of sense.
In this travis picking lesson, we’re going to discuss the fundamentals about this technique and why every guitarist needs it in their bag of musical tricks.
If we want to make the most of this travis picking lesson, we’re going to have to work on finger independence.
This takes time, but it’s well worth it to build up your chops in this area.
Learning to use your thumb to play a bass line while the rest of your fingers take care of the chords is no small feat, but it will make you an infinitely better guitarist with enough practice.
Before we get into the depths of technique and how to approach this travis picking lesson, let’s talk a bit about Merle Travis himself and why his contributions to the guitar community were so huge.

Who Was Merle Travis & Why Was He So Important?
Merle Travis was an American singer-songwriter and country-western guitarist who lived from 1917 to 1983.
Travis has released countless albums that influenced the way we as guitarists approach our instrument.
From albums like “Songs of the Coal Mines” and “Our Man From Kentucky” to other instrumental feats like “Strictly Guitar” and “Travis Pickin’,” Merle Travis’s guitar feats could be heard just about anywhere.
What was interesting about Travis was that he had released instrumental albums as well as vocal albums. This wasn’t heard of as much back then as it is these days.

This is one of the things that made Merle Travis such an icon – his innovation with his instrument and how we drew attention to it.
People all over were drawn to Travis’ ability to accompany himself, and these techniques have passed their way down all the way to modern fingerstyle guitarists today.
Years later, Merle’s son Thom would release a VHS called “The Real Merle Travis Guitar – Like Father, Like Son” where he would unveil all the secrets of his father’s legendary techniques in a one-of-a-kind travis picking lesson.
This tape, along with Merle’s discography solidified his place not just as a top-tier musician, but as a guitarist with an impact that would resonate for generations upon generations to come.
Now, with that little history lesson out of the way, let’s have a look at this travis picking lesson up-close.

Learn 12 EASY beginner chords with our popular guide
✅ Stop struggling. Start making music.
✅ Learn beginner-friendly versions of every chord.
This is our most popular guide and it will improve your chord ability quickly! 😎
Get your own personalised guitar-learning plan 🎸
Get a custom guitar-learning plan here: Click here for GuitarMetrics™
World-Class Guitar Courses 🌎
Learn from the world's best guitar educators: Click here for our guitar courses
What Are The Fundamentals Of This Travis Picking Lesson?
In order to understand this travis picking lesson, we first need to understand how syncopation works.
“Syncopation” is defined as multiple rhythms being played at the same time. These rhythms don’t have to be in different time signatures, but they can be.
This sounds like a daunting technique at the beginning, but it’s quite simple to make it work.
All we have to do is split up the patterns that we play between our thumb and our other four fingers.
Let’s try to unpack that concept below and throughout the rest of this travis picking lesson.

In order to effectively play a syncopated piece of music, we need to understand how to split up our fingers in terms of what their duties are.
In this travis picking lesson, you’re going to learn how to treat your thumb like the bass player in the band while your four fingers take care of the chordal and (sometimes) melodic guitar work.
Who says you need a full band to sound like a full band? Not Merle Travis, that’s for sure.
What we will be doing here is learning how to assign a specific pattern to the thumb, and a different pattern (or multiple) to the rest of the hand.

Travis Picking Lesson I – Start With The Thumb
Before we get into the nitty-gritty, we need to start with our thumb if we want to get the most out of this technique.
This travis picking lesson aims to teach you thumb independence, so let’s start with something basic.
We’re going to start with the two lowest notes in a G major chord with only our thumb.
Play the 3rd fret on the E string and the 2nd fret on the A string back and forth, beginning with the A string.
Try to keep your picking as consistent as you can to get the most out of this travis picking lesson, and have a look at the tablature below to get a better guide on how to play this passage.

Now that we’ve gotten our first chord under our thumb (get it?), we can move on to the second chord: C major.
As with the start of this travis picking lesson, we’re going to focus on the two lowest notes and play them only with our thumb.
You’re going to want to keep the rest of your fret hand open for the next section of our travis picking lesson, so play the low C on the A string at the 3rd fret with your ring finger, and the E note on the D string 2nd fret with your middle finger. This will keep the index and pinky reserved for later.
Pro Tip: Cycle back and forth between these two chords before moving forward. Check out the tab below for the full passage.

Travis Picking Lesson II – Adding Chords Against The Bass
Now that we’ve worked out our little two-chord pattern in the bass, we need to add in some chords for colour.
It’s important that we maintain our bass picking pattern the way it is currently. Your other fingers might sway your thumb a bit at the beginning, but stay on track! We want our thumb to be separate from our other fingers to get the most out of this travis picking lesson.
While we keep our bass pattern going over G major for this first example, we’re going to pick the top two strings of the chord in between bass plucks with our middle and ring fingers.
Check out the tab below to see what we mean:
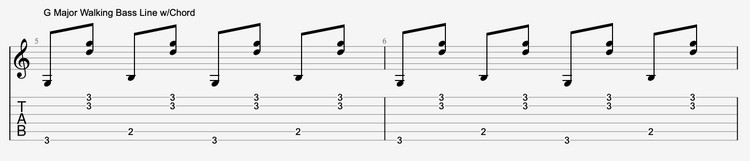
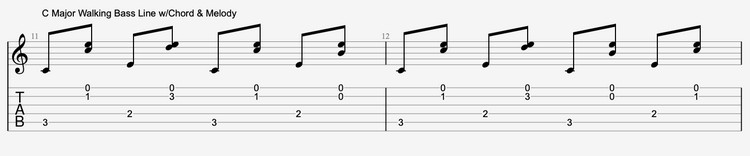
Now, let’s do the same for the C major chord to round out the midsection of this travis picking lesson.
We’re going to play the high E and B strings the same as we did above. Try and drill this pattern as much as you can, and see the tab below for the complete progression up until this point.
For the sake of this travis picking lesson, we’re opting to play the two highest strings, but you can swap these for the G and B strings as well if you like.
We recommend experimenting with adding different strings of the chord to get different tones out of this travis picking lesson.
The more notes that you can find to add in different progressions, the better in this scenario.

Travis Picking Lesson III – Adding The Beginnings Of A Melody
This is where things start to get more complex.
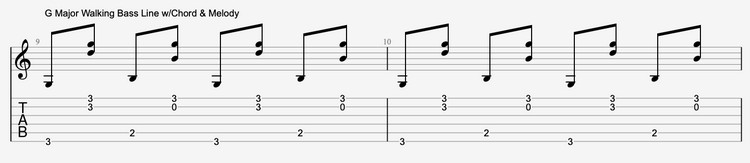
Once you’ve perfected the art of walking a bassline through this travis picking lesson and adding the top-end of your chords, you can start to play a bit more with the chords to add a melody.
We’re now going to take this same chord progression (G major and C major) and begin to add a bit of melody by altering some of the notes as we play.
Start with the G major chord and alternate between playing your B string at the 3rd fret and open position to start up a bit of movement.
Check out the tab below to see what we mean for this segment of our travis picking lesson.
Now, we’re going to apply this same principle to the C major chord, but we can use this chord to generate a bit more movement than we can with the G major chord.
With your hand stretched across the C chord, you can use your pinky to reach other notes outside of the immediate chord. We can use these notes to “decorate” our chords and create a melody within the chord itself.
Pro Tip: The advantage with learning this travis picking lesson is that you can maximize your movement within chords in the open position very easily.
Take a look at the tab below to see how this exercise looks on paper, then let’s start to wrap this up.
Download our lead guitar cheat-sheet to make things easier
It's hard to understand which scales work with which keys.
So we created a cheat-sheet! A key and scale-finder that you can use again and again.
Get your personalised guitar-learning plan 🎸
Get a custom guitar-learning plan here: Click here for GuitarMetrics™
World-Class Guitar Courses 🌎
Learn from the world's best guitar educators: Click here for our guitar courses
How Do We Put The Elements Of This Travis Picking Lesson Together?
We’re not going to beat around the bush here – this technique takes some time to perfect.
Proper syncopation is a task in itself and is the key element of this travis picking lesson, but it’s one that will make an incredible world of difference in your guitar playing over time.
Let’s look at how we can better visualize the rhythms used in this travis picking lesson below. We’re going to use eighth notes (1 & 2 & 3 & 4 & ) to count out what to play over the G major chord.
1 & 2 & 3 & 4 &
B C B C B C B C
The “B” stands for “bass” and the “C” stands for “chord”.
Try and count this out while you play – you’ll find that it helps you improve on your timing and beat placement rather quickly.

If you want to conquer this travis picking lesson, you’re going to have to start slow.
Rushing into an exercise at full speed is one of the worst things we can do for ourselves, as we don’t allow our brains enough time to start building muscle memory in an effective way. Take it slow!
Pro Tip: This travis picking lesson aims to teach you the bare fundamentals of this technique. Although many guitarists out there make excellent use of this technique in a variety of technical ways, we all have to start somewhere.
Start small with this one using the exercises in this travis picking lesson, and you’ll have a great foundation to start learning more about finger independence.

Tips & Best Practices For This Travis Picking Lesson
If you’ve gotten this far, chances are you’re doing pretty well already!
By now, you’re ready to tighten up the screws of this travis picking lesson and really start to integrate this technique into your playing in new ways – that’s great news!
Let’s look at a few last tips for how to tighten up this technique below:
- Use a metronome – this one works really well for mastering this travis picking lesson, as a metronome will show you exactly where to place each beat accurately inside a bar of music. If you don’t have one, you can use a free one here

- Use this walking bass technique over different pairs of chords in order to perfect it in different musical contexts
- Watch videos of Merle Travis himself demonstrating his superb skill for yourself so you can see how he plays. Don’t be afraid to slow the video down to better see what he’s playing
- Log your progress with the different chords and patterns that you have experimented with, and come back to them often for practice
- Listen as much as you play – listening to Merle Travis recordings to hear how he approached his technique is a whole travis picking lesson in itself. Pick a song and spin it, your ears will be happy that you did

Check Out Some Of Our Favourite Merle Travis Performances!
This man was a legend who left a grand legacy of virtuosic guitar playing for all of us to enjoy. It only makes sense that we spread the love around as best we can.
We’ve put together a short list of our favourite videos of his performances that feature the essentials of this travis picking lesson to send you off with.
Click the links below to get inspired:
Recommended Resources
If you loved this travis picking lesson, you’re going to want to tune into the lessons we have below for you:
- 10 Awesome Fingerpicking Patterns
- Guitar Arpeggios – The Ultimate Guide
- How To Find Chords For A Song
- Guitar Scales Chart
- 8 Intermediate Guitar Songs
What Type of Guitarist Are You?
Take our 60-second quiz & get your results: Take The Quiz
Join the world's best online guitar school 🌎
- Get your own personalised guitar learning plan (customised just for YOU).
- World-class online guitar courses. Learn at your own pace.
- Community Campus & Learning Forum - A friendly community! Connect with our team & students. 😊
- Beginner Song library with chordsheets, tabs and tips. (Songs suitable for all levels!)
- Regular live streams, seminars and Q&A sessions - Learn from world-class guitar educators. Get all your questions answered!
Click here to learn more about National Guitar Academy membership ![]()
Cool Guitar T-shirts 😎
Look cooler! Check out our merch: Click here to see our merch store
Want free guitar tips and video lessons delivered to your inbox?
Join over 100,000 guitar-learners and subscribe to our guitar-tips-by-email service. (It's free.)
We'll send you a series of lessons that will move you to the next level of your guitar journey.
Learn how everything fits together quickly, easily and effectively. We share ninja tips (for instant fun!) but also timeless fundamentals that will deepen your understanding.

Popular Lessons
How To Learn Guitar: An 11-Step Programme For Beginners
How To Choose The Perfect Beginner Guitar
More Cool Guitar Stuff
Learn about National Guitar Academy: About Us
Join us on Facebook for daily guitar tips.
Listen to our Learn Guitar Podcast for rapid guitar progress.
Check out our free chord lessons.
Get our best guitar tips & videos
Where should we send it?
Where should we send it?
Get our best guitar tips & videos